
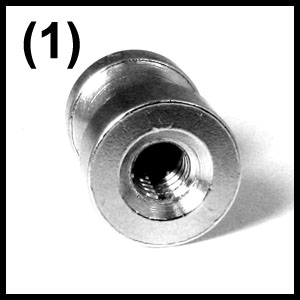
(1) All spikes are "screwback". They come with a tap on the bottom.

All of the screwback spikes we sell are made for easy application and great looks. The screw supplied is used to fasten the spike onto your project. It is a quick job to spike leather (or other material). Below is a detail description of each step.
Detailed Instructions.
Reference the instruction numbers with the photos on the back of this flier.
1) StudsAndSpikes sells “screwback” spikes because of their ease in small craft projects or large productions, without needing any special dies or tools for each spike. All of the spikes on StudsAndSpikes.com are sold with a screw that fits the bottom tap of the spike.
2) With the material you want to spike, punch a hole where you want the spike to go. StudsAndSpikes sells a “Multi-Hole Punch” used for leather and similar material.
2a) Tip: Often when working with certain denim or other textiles, you may not want to “punch” out part of the material, as it may fray. Instead you may want to spread the weave to make a hole big enough for a screw. A non-bladed awl (Like our “Dart Awl”) can help you with this.
3) Take the screw and push it through the material so that the screw-head is on the bottom of the material, and the threaded side points up. The hole should fit the screw-thread snug; the screw should not be able to move around freely.
4) Take the spike and twist/screw it onto the thread. To tighten it, use a screwdriver on the bottom and twist while holding or pinching the spike as hard as you can.
4a) Tip: When working with denim or other textiles, your material may be very thin. This may cause puckering material or a sagging spike. You can try to use a backing to help keep the spike upright to the material. Backings can include a small piece of leather, more cloth, a washer, etc.
5) Repeat steps for each spike. With practice and the right tools, your job becomes quick and the finished product admirable.
Tools sold at StudsAndSpikes.com for spiking:
Multi-Hole Punch. (Item code: 170-0005) This tool works well with leather and other tough materials. It comes with six different punch sizes.
Dart Awl. (Item code: 170-0006) A non-bladed awl, The Dart Awl has only one point for puncturing. A simple tool that make small slits in leather or helps open holes in weave. This tool is universal.
Cobblers Mat. (Item Code: 170-0003) Sometimes it is used to protect the surface you are working on. The mat will take the punches and slices when working with leather.
Mallet. (Item Code: 170-0004) Sometimes used to help punch the awl through particularly thick or stubborn leather.
Other low-cost household items and tools that may be used:
Exacto Knife. May be used like the Awl to make slits. Watch out for their big blade; It is bad if you make a slit in the material that is too wide for the screw.
Flathead Screwdriver, Phillips Screwdriver. All of the spikes that StudsAndSpikes sells either have a flathead slot or a Phillips slot. The screwdriver helps you tighten the spike onto the material.
Kitchen Cutting Board, Wood Board. May be used to protect your work area from the blades or points of the awl. When working with leather, wood often does not give as nicely as a Cobblers Mat.
Loctite or Glue. Loctite or other glues designed for metal can be used for extra hold or to attach. When it is desirable for the screw to hold on tight to the spike, Loctite (or similar metal glue) can be used. Many people using spikes for auto or motorbike detailing will use Loctite Blue (or red for permanent glue) to secure the spike onto the screw thread. (There are also other glues and epoxies used to secure the spike right onto leather, plastic or other material without using the screw for this, but this is not our expertise.)
(1) All spikes are "screwback". They come with a tap on the bottom.
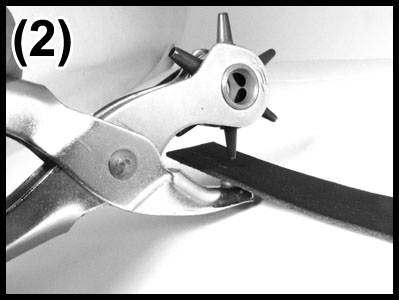
(2) Punch the leather to make a hole for the screw.
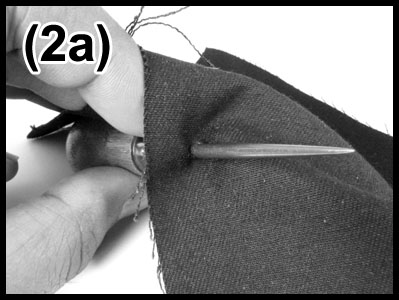
(2a) When working with denim or textile, moving the weave apart may be more desirable.

(3) From the underside of the material, push the screw through the hole. The screw should fit snug in the hole.

4) Twist the spike onto the screw with your fingers. Use a screwdriver to get it tight.

4a) With denim or textile, you may need to use a backing. Shown here is a washer.

5) Each spike project is different. Use the tools that perform the best and each project will look its best. Shown here are the Multi-Hole Punch, a finished bracelet, screwdriver, loose spikes, and a Dart Awl.